Set up continuous translation with Weblate and i18next
I recently created a ReactJS project (Openhex).
I used i18next to translate it in English and French, and Weblate to allow contributors to help in translations through a web interface by translating sentences, or even add new languages.
Translating with i18next
I had two sources of strings in my source code:
- In Javascript source code
throw new IllegalMoveError('You have not enough money to buy an unit.');
- In ReactJS templates
<button onClick={ () => { this.buyUnit(); } }>
  Buy an unit
</button>
This is a front application (not a nodejs backend). I wanted to use translation keys, which means that I use a constant/unique key, then translate it in English, and in others languages:
throw new IllegalMoveError('You have not enough money to buy an unit.');
becomes:
throw new IllegalMoveError('cannot_buy_unit.not_enough_money');
I checked out many i18n libraries, and I finally used i18next for its great community, and all the existing modules, especially:
- react-i18next to translate ReactJS templates,
- i18next-scanner to parse my source code and automatically dump translation strings into translation files,
- i18next-browser-languageDetector to automatically set the application lang by guessing it from the user browser.
First thing, let’s translate Javascript strings (will translate the react templates later).
Installing i18next
Using npm:
npm install i18next --save
Which installed version ^10.5.0.
Configure i18next
I18next let you configure the main module instance, or a “created instance”. If you have only one translation file folder, you can use the main i18next instance, which mean you configure it like that:
src/i18next.js:
import i18next from 'i18next';
import { en, fr, es } from './engine/locales';

# Configure i18next
i18next.init({

  # Useful for debuging, displays which key is missing
  debug: true,

  # In which lang to translate (will be set dynamically later)
  lng: 'en',

  # If translation key is missing, which lang use instead
  fallbackLng: 'en',

  # Namespace to use by default, when not indicated
  defaultNs: 'translation',
});

# I load my translation files
i18next.addResourceBundle('en', 'translation', en);
i18next.addResourceBundle('fr', 'translation', fr);
i18next.addResourceBundle('es', 'translation', es);
src/engine/locales/index.js:
import en from './en.json';
import fr from './fr.json';
import es from './es.json';

export {
    en,
    fr,
    es,
};
src/engine/locales/en.json (using embed JSON):
{
  "cannot_buy_unit": {
    "not_enough_money": "You tried to buy or upgrade an unit, but you have only  gold, and an unit costs ."
  }
}
(and the same in fr.json, es.json, with translated strings).
You can now translate string in source code by reusing i18next module
as the configuration has been loaded in the main instance with i18next.init():
import i18next from 'i18next';

i18next.t('cannot_buy_unit.not_enough_money', {
  playerMoney: 4,
  unitPrice: 10,
});
Using i18next.createInstance()
The example above works well for a “simple” translation unit (only one translation folder and configuration).
In my case, I had multiple translations folders, with different translations files formats (one in embed JSON, another in inline JSON).
Why using multiple translation folders ? I wanted to separate the engine translations with the user interface translations so that I could easily move the engine logic outside, in another repository. Also, I prefered multiple small translations units with differents concerns.
Let’s create an instance of i18next for the engine component.
I just need to use i18next.createInstance().init({ ... })
in order to configure only a new instance of i18next instead of
the main instance. Then, as soon as I created my own instance,
I need to export the instance as a module to reuse it:
src/i18next.js:
import i18next from 'i18next';
import { en, fr, es } from './engine/locales';

# Create a fresh instance of i18next
const i18n = i18next.createInstance();

# same config...
i18n.init({
  debug: true,
  lng: 'en',
  fallbackLng: 'en',
  defaultNs: 'translation',
});

# loading my translation files
i18next.addResourceBundle('en', 'translation', en);
i18next.addResourceBundle('fr', 'translation', fr);
i18next.addResourceBundle('es', 'translation', es);

# Then, important thing, I export my instance
export default i18n;
Translating using my new instance is like:
src/myscript.js:
# Importing my i18next instance
import i18n from './i18next';

# using it
i18n.t('cannot_buy_unit.not_enough_money', {
  playerMoney: 4,
  unitPrice: 10,
});
This way, I can create another instance with a fully different configuration:
src/other-component/i18n/index.js:
import i18next from 'i18next';
import { en, fr } from './locales';

const i18n = i18next.createInstance();

i18n.init({
  debug: true,
  lng: 'fr',
  defaultNs: 'messages',
});

# loading my translation files
i18next.addResourceBundle('en', 'messages', en);
i18next.addResourceBundle('fr', 'messages', fr);

export default i18n;
Note about cloning instance: i18next allows to clone instance in order to reuse an existing instance and override some configuration.
Translate React templates
TLDR:
return (
  <button onClick={ () => { this.buyUnit(); } }>
    Buy an unit
  </button>
);
becomes:
# Import I18n react component
import { I18n } from 'react-i18next';

# Import your i18next instance
import i18n from './i18n';

return (
  <I18n i18n={ i18n }>
    {t => (
      <button onClick={ () => { buyUnit(); } }>
        { t('buy_unit') }
      </button>
    )}
  </I18n>
);
Installing and using this module didn’t caused so much troubles:
https://react.i18next.com/overview/getting-started.
The idea is to use the I18n react component,
and pass your own i18next instance as prop: <I18n i18n={ i18n }>.
Then, you can use the t function to translate strings
in your template: <p>{ t('my_string') }</p>.
Here is how it looks like at the end on a real application: https://github.com/alcalyn/openhex/blob/f799a693914b0deae70612c5a78958423dcd0d60/src/components/GameMenu.js#L29-L47.
Dynamically translation guessing the user language
Install the i18next-browser-languageDetector module:
npm install --save i18next-browser-languagedetector
Which installed version ^2.1.0.
Then configure the module:
import LngDetector from 'i18next-browser-languagedetector';

i18next
    # Register the module
    .use(LngDetector)

    .init({
        debug: true,
        fallbackLng: 'en',
        defaultNs: 'translation',
        # lng: 'en',    <= Remove this or it will override auto detection

        # Configure the module
        detection: {
            # I want to guess from:
            #   - querystring first (when having in url ?lng=fr)
            #   - or navigator (the browser Accept-Language I guess)
            order: ['querystring', 'navigator'],

            # You can change the query string here to customize your urls
            lookupQuerystring: 'lng'
        }
    })
;
See module configuration reference here.
Automatically extract translation keys from source code
A last thing to automate a boring step: Copy all translations keys from source code and templates and paste them in all translation files.
I don’t want to look for any translation keys like t('home_page') or <h2>t('game_rules')</p>,
and pase them manually to every files like en.json, fr.json, … and eventually new future languages.
So I used i18next-scanner to parse my source code and automatically dump translation strings into translation files.
By running i18next-scanner with a config file, it automatically update my translations file
by adding new translations keys, keeping already translated strings…
I installed it with
npm install i18next-scanner --save-dev
Which installed the version 2.4.6.
I have translation strings from both javascript source code and react templates.
So I created 2 configuration files, here is one as example:
i18next-scanner.config.engine.js (in root folder):
module.exports = {
    options: {
        debug: true,
        // read strings from functions: IllegalMoveError('KEY') or t('KEY')
        func: {
            list: ['IllegalMoveError', 't'],
            extensions: ['.js'],
        },

        trans: false,

        // Create and update files `en.json`, `fr.json`, `es.json`
        lngs: ['en', 'fr', 'es'],

        ns: [
            // The namespace I use
            'translation',
        ],

        defaultLng: 'en',
        defaultNs: 'translation',

        // Put a blank string as initial translation
        // (useful for Weblate be marked as 'not yet translated', see later)
        defaultValue: (lng, ns, key) => '',

        // Location of translation files
        resource: {
            loadPath: 'src/engine/locales/.json',
            savePath: 'src/engine/locales/.json',
            jsonIndent: 4,
        },

        nsSeparator: ':',
        keySeparator: '.',
    },
};
I added in my package.json file the following script:
"scripts": {
  "translations-scan": "i18next-scanner --config i18next-scanner.config.engine.js src/engine/*.js"
}
So that I can run npm run translations-scan, and let the plugin scan my source code in src/engine/*.js
and extract strings.
Then it created translations files in src/engine/locales/ with blank translations.
Here is my live example, with the configuration files in root folder: https://github.com/alcalyn/openhex
I don’t want to edit these files manually, as it would take so much time, and I don’t talk all languages. Instead I want to let people who want to contribute in their language to do it.
This is now the time to use Weblate !
Set up continuous translations with Weblate
Now that you have a translated application, you have to maintain and create new translations strings for all languages, and update every time you add a new string.
To do this as a developer, you need to clone your project, edit your translations files (json, po, xml files…) and commit them back.
This worklow requires your contributors to know how to use git. Also they need to edit translations strings in a format that is not always natural, and can lead to syntax errors (missing quotes in json, missing closing tag in xml, indentation error in yml…).
That’s why you need a translation interface: make anyone to easily translate your project in any language.
Many software exists for that, but I used Weblate for the following reasons.
What is Weblate
Weblate is a free (GNU-GPL) software you can try here.
You can install your own instance locally, or on your server, and avoid to be dependent to any external service.
This is useful as you can also freely install Weblate in your enterprise and use it for any software.
If you don’t want to install your own instance, Weblate has also a paid SaaS offer, but non-paid for free softwares.
I opted for installing my own instance.
Deploying my own instance
I used Docker to avoid to install required dependencies (PHP, python).
Note: Docker helps me to run an application without installing all packages it requires by running the application in a “container”, like a lightweight virtual machine, where all is installed. Then you just has to remove the Docker container, and no residual packages stay on your machine. You can install Docker and docker-compose here.
I installed it following the documentation to install Weblate with Docker:
git clone https://github.com/WeblateOrg/docker-compose.git weblate-docker
cd weblate-docker/
Then I created a docker-compose.override.yml file:
version: '3'
services:
  weblate:
    environment:
      # Any smtp server to enable mail sending
      - WEBLATE_EMAIL_HOST=smtp.example.com
      - WEBLATE_EMAIL_HOST_USER=user
      - WEBLATE_EMAIL_HOST_PASSWORD=pass

      # Configure "From:" emails
      - WEBLATE_SERVER_EMAIL=weblate@example.com
      - WEBLATE_DEFAULT_FROM_EMAIL=weblate@example.com
      - WEBLATE_ALLOWED_HOSTS=localhost

      # Your admin user login and password
      - WEBLATE_ADMIN_PASSWORD=mypassword
      - WEBLATE_ADMIN_EMAIL=weblate.admin@example.com
And I run:
docker-compose up
Then, go to http://localhost.
Note:
You can use another port if your port 80 is already used.
Change it in docker-compose.yml by replacing - 80:80 to - xxxx:80.
You can login with weblate.admin@example.com / mypassword, but it will be empty for now,
you need to configure your projects.
Configure your translation workflow
Well, luckily, installing Weblate was not so hard with Docker. But now, let’s start the tricky part: configuration !
Weblate can handle tons of differents translation workflows: fetch sources from any repository, parse any translation files format (po, xml, json, embed json…), push modified strings to your repo on the branch you want, create a pull request or not, allow anonymous contributors to suggest correction, automatically submit suggestion once 3 people approved…
That’s why I took some time to figure how to set up my use case. But anyway, your use case is much likely covered by Weblate.
Let’s read the doc: I found that Weblate documentation is exhaustive, but not well organized: I don’t find easily what I am looking for.
But I will explain here only what I needed in the beginning.
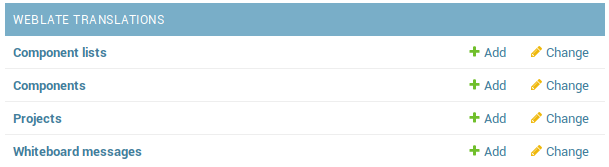
The weblate admin interface is here: http://localhost/admin. Then go to “Weblate translations”, and you need to add “projects” and “components”.
Projects and components
First thing you need to setup your workflow: projects and components.
A project is a “folder” containing components.
A project represent your project, with an optional home page, has a source language.
A component represent a specific folder in your specific repository containing translation files in a specific format. It contains all the rules to fetch, parse translation files, and commit back to your repository.
Concrete example
In my project:
I want to weblatify the folder src/engine/locales. It contains embed json files: https://github.com/alcalyn/openhex/tree/master/src/engine/locales.
Here is how a translation file looks like:
{
    "cannot_buy_unit": {
        "not_enough_money": "You tried to buy or upgrade an unit, but you have only  gold, and an unit costs .",
        "selection_not_empty": "You tried to buy a new unit, but you have a tower in your selection. Place your tower first."
    }
}
And how I display message in source code:
i18next.t('cannot_buy_unit.not_enough_money');
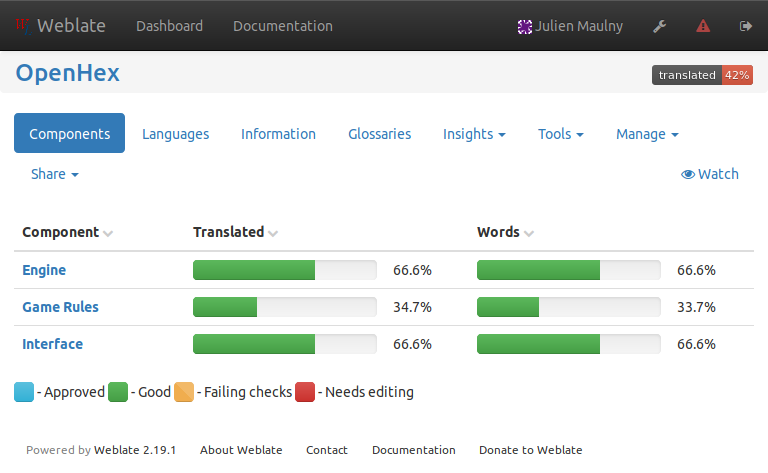
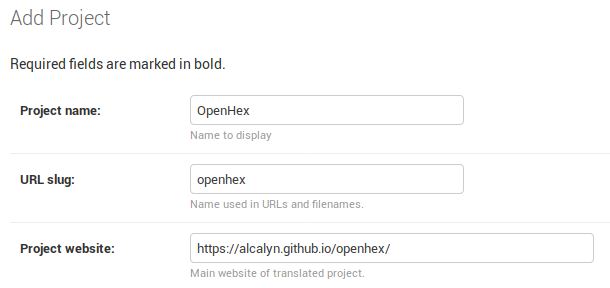
So let’s create a project called “Openhex”, and filling the required field project website with my project home page.
Now, let’s create the “Engine” component in the project.
I can now create my first component inside this project. Go back to the main admin page at http://localhost/admin, and Add a new component.
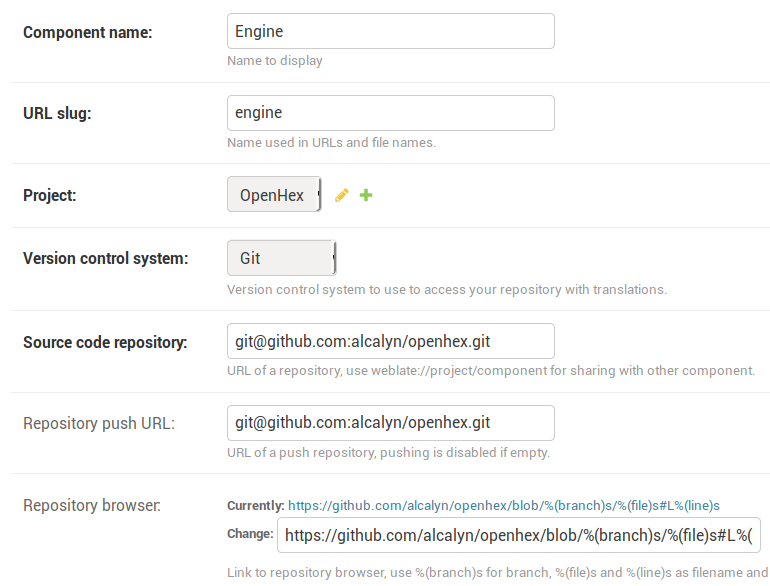
Here is what the fields means:
-
Component name: Set a name that represent which part of your application you are translating. it can be “User interface”, “Documentation page”, “Admin interface”, “Plugin whatever”, …
-
Url slug: Actually it is auto filling, so let it as is, or change it if you want another url than:
http://localhost/projects/openhex/engine/. -
Project: Place the component in the project you created before.
-
Version control system: Weblate handle other VCS, but my project is using git.
-
Source code repository: The git url where Weblate will clone and pull translation base files. Set your project Github url.
The URL beginning by git@github.com: is recommended because more secure and simpler, as soon as you added Github ssh key in the SSH keys admin page at http://localhost/admin/ssh. See Weblate documentation.
-
Repository push URL: Weblate allows to prevent push to your source repository, and instead let you push translation files manually. I prefered to do it through Weblate, so I set the same Git URL than Source code repository to enable the feature.
-
Repository browser: In the translation interface, Weblate displays a link to the source code where the translation string comes from. By filling this field, you can display a link to the source, but actually I didn’t see where the link is displayed… For a Github project, put
https://github.com/YOUR_NAME/YOUR_REPO/blob/%(branch)s/%(file)s#L%(line)s
Let’s configure translation files:
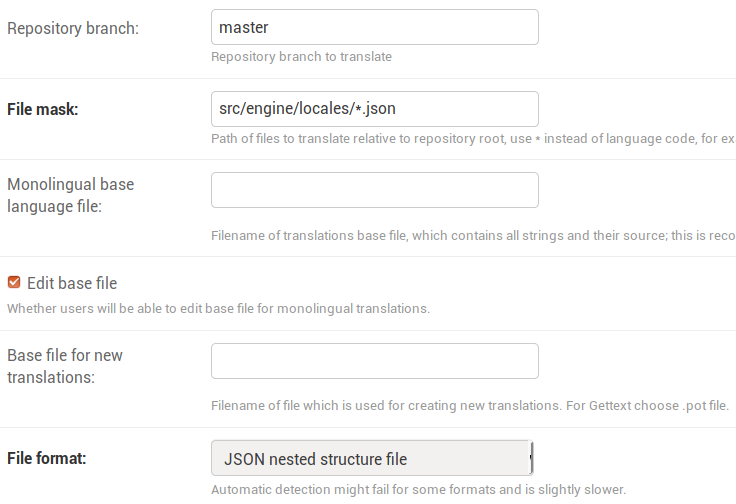
- Repository branch: The branch of your project where translations will be fetch and push.
I set here my main branch, which is
master, but it could bedevelop.
I guess you could set here a release branch to translate only before release a version of your application,
or another branch to prevent to merge on your development branch…
-
File mask: Maybe the most important field (with Source code repository), represents where your translation files are located. Weblate will parse files matching this glob. I set
src/engine/locales/*.json, but I guess it could belocales/**/*.jsonif your lang are sorted by folders, orlang/messages-*.po… -
File format: Weblate can detect it automatically, but I didn’t tested the automatic detection. I picked my translation file format. I was surprised by how many formats Weblate handles…
We configured all required fields, and let others by default.
You can submit. Weblate will immediately pull repository and parse files.
If you are running Weblate with docker-compose up,
you should see in logs in terminal when it is cloning the repository.
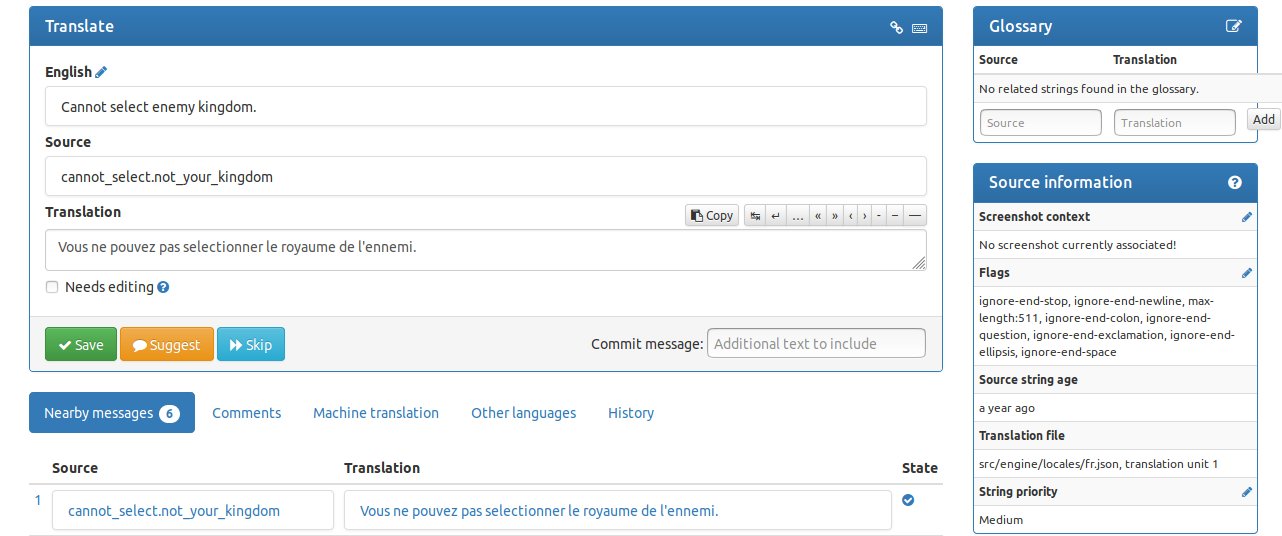
You should now see your project on the translation interface at http://localhost/projects. Open it, open your component, and you should be able to start translating !

If you are seeing that your application is translated at 100% but in fact is not,
it is because you probably configured i18next to pre-fill translated string
with either a string like __STRING_NOT_TRANSLATED__ or the key.
You must disable that, let an empty string for new strings, and fallback
your translations to English language.
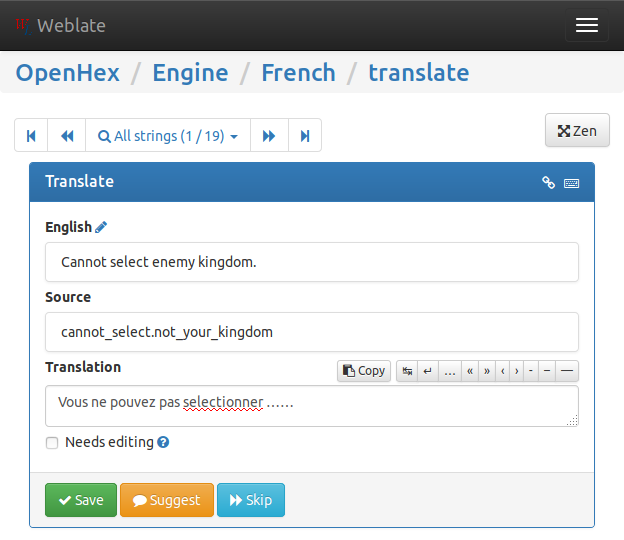
Well, I let you discover the Weblate interface and features.
For example I enabled GitHub login by creating a GitHub application,
I filled GitHub tokens in environment file at the root folder of Weblate Docker:
WEBLATE_SOCIAL_AUTH_GITHUB_KEY=537...............11
WEBLATE_SOCIAL_AUTH_GITHUB_SECRET=7aa..................................b61
Restarting docker-compose, and I can now authenticate with my GitHub account.

Julien Maulny
Leave a comment